
In order to configure your Google Workspace email ID in POP/IMAP follow the below mentioned steps.
- To configure your Google account in the IMAP you have to enable the IMAP on that particular account for that on your computer open the “gmail.com” url.
- In the top right, click Settings
See all settings.

- Click the Forwarding and POP/IMAP tab.

- In the “IMAP access” section, select Enable IMAP.

- Click Save Changes.
2. After enabling the IMAP access open your local outlook client and click on the “Files” menu and click on the “add account”.

3. Add account pop windows will be open click on the “add account manual” and click next.

4. In the next windows select the service like “IMAP/POP” in order to configure the account and click next.

5. In the next Windows add the required incoming and outgoing server details as per the IMAP protocol and the email ID and login details.
=================
Incoming Server:imap.gmail.com
Outgoing Server:smtp.gmail.com
===================
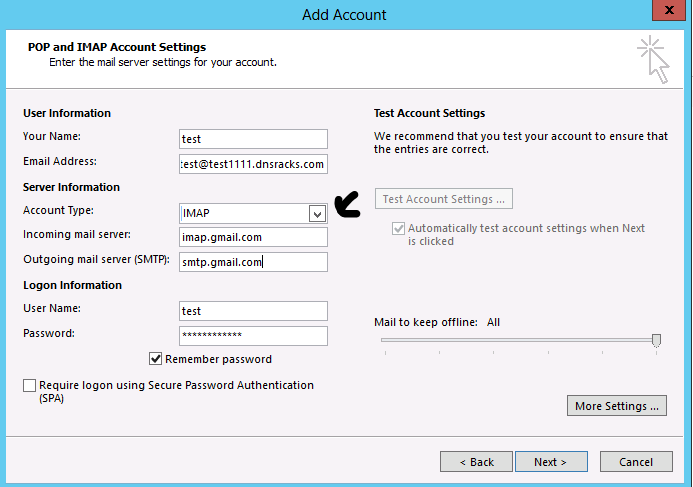
6. Now Click on the “More Settings” option and in the outgoing server tab check mark on the option “My server require outgoing smtp authentication”.

7. Click on the next tab “Advanced” and fill the required port number as per the IMAP protocol and click on “okay”.

8. Click next and your account has been configured with the IMAP protocol.
In order to configure your email account using the POP protocol you have to enable the POP access on your Google account using the same steps that are mentioned in the starting first second and third.
- After enabling the POP access on your email account open your outlook account and click on the “files” menu and “add account”

2. Add account popup windows will be open click on the “add account manual” and click next.

3. In the next windows select the service like “IMAP/POP” in order to configure the account and click next.

4. In the next Windows add the required incoming and outgoing server details as per the POP3 protocol and the email ID and login details.
Incoming Mail server:pop.gmail.com
outgoing smtp server:smtp.gmail.com

5. Now Click on the “More Settings” option and in the outgoing server tab check mark on the option “My server require outgoing smtp authentication”.

6. Click on the next tab “Advanced” and fill the required port number as per the POP protocol and click on “okay”.

7. Click next and your account has been configured with the POP protocol.


